Integrate gitStream with Zapier
Zapier is a workflow automation tool that connects to more than 7,000 apps and APIs and allows you to pass data between them using processes called Zaps. After something triggers the Zap, it’ll sequentially call the different pieces of your workflow.
Prerequisite Configurations
To use gitStream with Zapier, you first need to do two things:
- Create a Zap with incoming webhooks enabled.
- Provide your Zapier webhook URL to gitStream as an organization environment variable.
Setup Incoming Webhooks in Zapier
Premium Zapier Subscription Required.
As of December 2023, Zapier’s Incoming Webhooks app is only available to premium members.
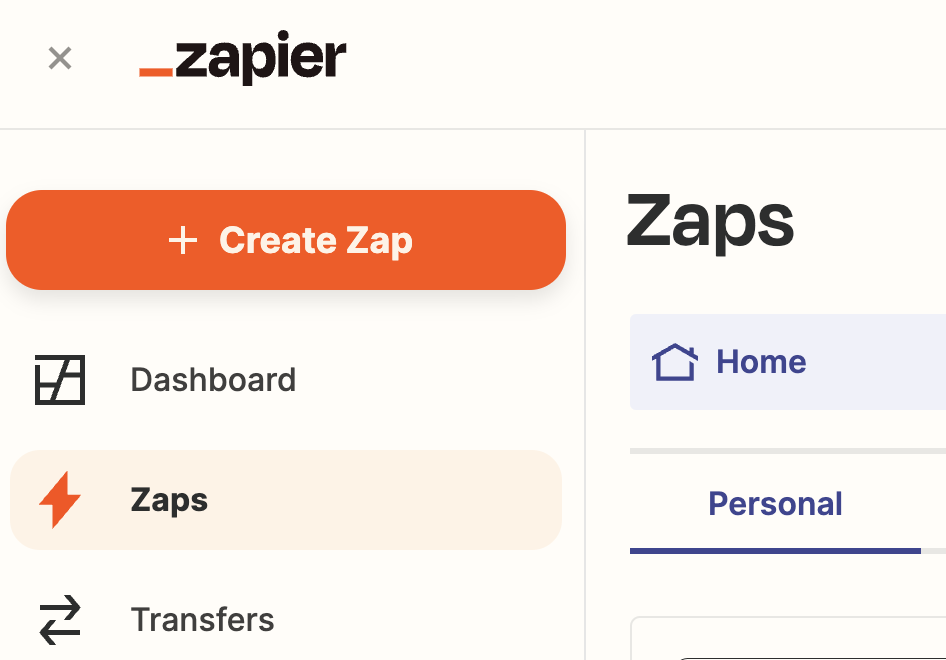
Get started by signing into Zapier and clicking Create Zap:
Then, select the trigger and find the latest version of the Webhooks by Zapier app:

Choose Catch Hook (to pass JSON data from gitStream to Zapier), but don’t add any child key (so the root object you send is parsed by Zapier). Then copy the URL it gives you and proceed to the next step
Your webhook URL is secret information!
Zapier webhook URLs allow anyone with access to the URL to use it. Do not publish this URL to public locations.
Configure Environment Variable
gitStream can access GitHub orgnization secrets as environment variables, and you'll need to do this to provide gitStream with access to your Slack webhook URL.
- Create an organization secret in GitHub and ensure it isn't being overridden by a repo-level secret of the same name.
- Pass the organization secret to gitStream as an environment variable in your
gitstream.ymlworkflow file. We recommend using an easy to understand term likeZAPIER_WEBHOOK.
You should now be ready to send data from gitStream to Zapier.
Export PR Data to Zapier
In your .cm file, you can include an automation that sends data to Zapier. Likely, you won’t be using exactly the workflow that we’re demonstrating here, but that’s alright; you can send any of the context variables in the body of the request for you to make use of in your Zap. It’s best practice to only send as much information as you need, so avoid sending unecessary data.
A Simple Zapier Example
This is an example of how to send data from gitStream to Zapier.
Configuration Description
Conditions (all must be true):
- A PR is created.
Automation Actions:
- gitStream sends a webhook to Zapier that contains the PR number
Store PR Data in a Table
Zapier can store data it gets from incoming webhooks in its internal database. In Zapier, click on the menu on the left side and select Tables. Then, create a new table called PRs with fields PR number, PR title, and PR URL, with types Number, Text, and Link respectively:

Return to the home page and create a new Zap following the instructions above, with twos changes. First, the webhook should only be run when the PR is created. Notice the on condition in the new .cm file below. Also, you’ll notice the example sends additional data points. This could be any data you want; gitStream makes numerous useful resources available via context variables.
Storing PR Data in a Table
Export new PR titles, numbers, and URLs to Zapier.
Configuration Description
Conditions (all must be true):
- A PR is created.
Automation Actions:
- gitStream sends the PR number, title, and URL to Zapier via webhook.
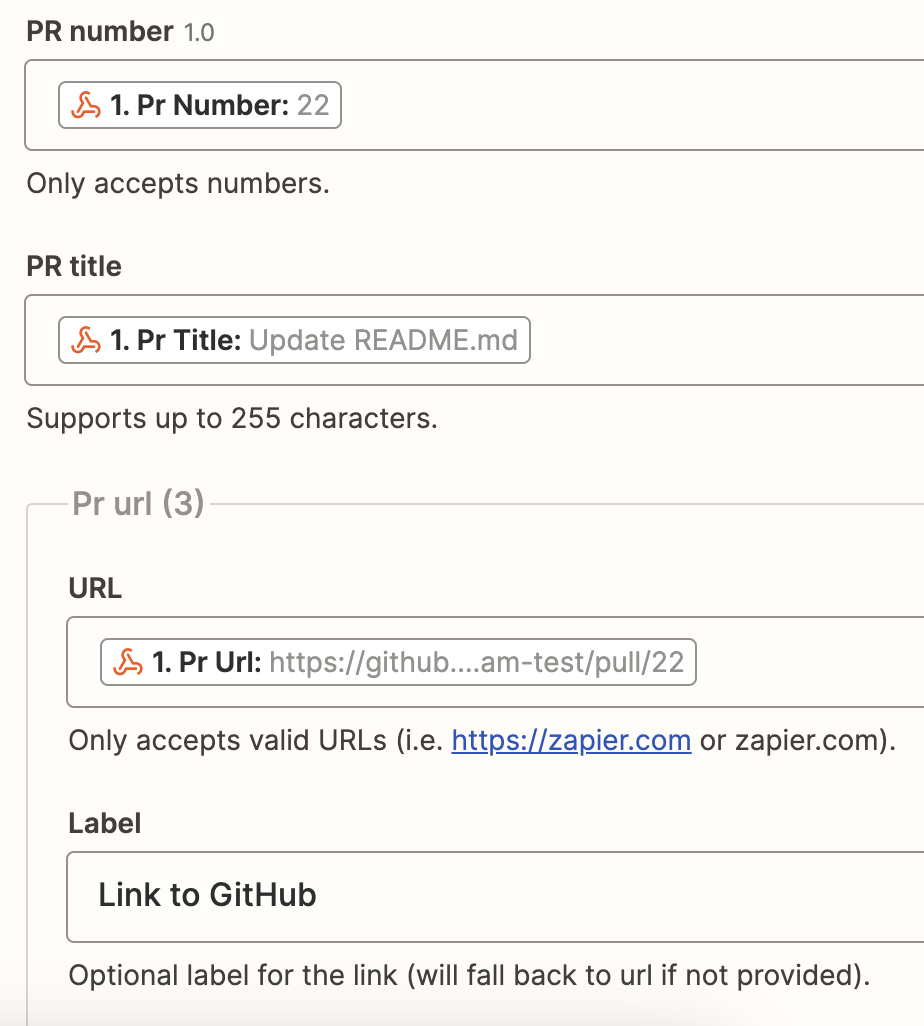
Export PR Number, Title, and URL to Zapier
# -*- mode: yaml -*-

manifest:
  version: 1.0

  pr_url: "https://github.com/{{ repo.owner }}/{{ repo.name }}/pull/{{ pr.number }}"

on:
    - pr_created

automations:
  zapier_export_pr_number_title_url:
    if:
      - true
    run:
      - action: send-http-request@v1
        args:
          url: "{{ ZAPIER_WEBHOOK }}"
          method: POST
          headers: '{"Content-type": "application/json"}'
          body: '{ "pr_number":"{{ pr.number }}", "pr_title":"{{ pr.title }}", "pr_url":"{{ pr_url }}" }'
After the webhook triggers, use the Tables app in the Zap to create a new record in your PR table with the available data.
Then, PRs will start showing up in the table as they’re created:

Now, you can integrate this PR data into the rest of your workflow! You could expand on this, adding date and status information so that other applications could automatically injest this data.
Create Project Management Tasks From PRs
The next example follows similar conventions as the last, except this on includes the PR description instead of the number:
Create PM Tasks From PR Data
Export new PR titles, description, and URL to Zapier.
Configuration Description
Conditions (all must be true):
- A PR is created.
Automation Actions:
- gitStream sends a webhook to Zapier that contains the PR title, description, and URL.
Create Project Management Tasks Via Zapier
# -*- mode: yaml -*-

manifest:
  version: 1.0

pr_url: "https://github.com/{{ repo.owner }}/{{ repo.name }}/pull/{{ pr.number }}"

on:
    - pr_created

automations:
  zapier_export_pr_description_title_url:
    if:
      - true
    run:
      - action: send-http-request@v1
        args:
          url: "{{ ZAPIER_WEBHOOK }}"
          method: POST
          headers: '{"Content-type": "application/json"}'
          body: '{ "pr_description":"{{ pr.description }}", "pr_title":"{{ pr.title }}", "pr_url":"{{ pr_url }}" }'
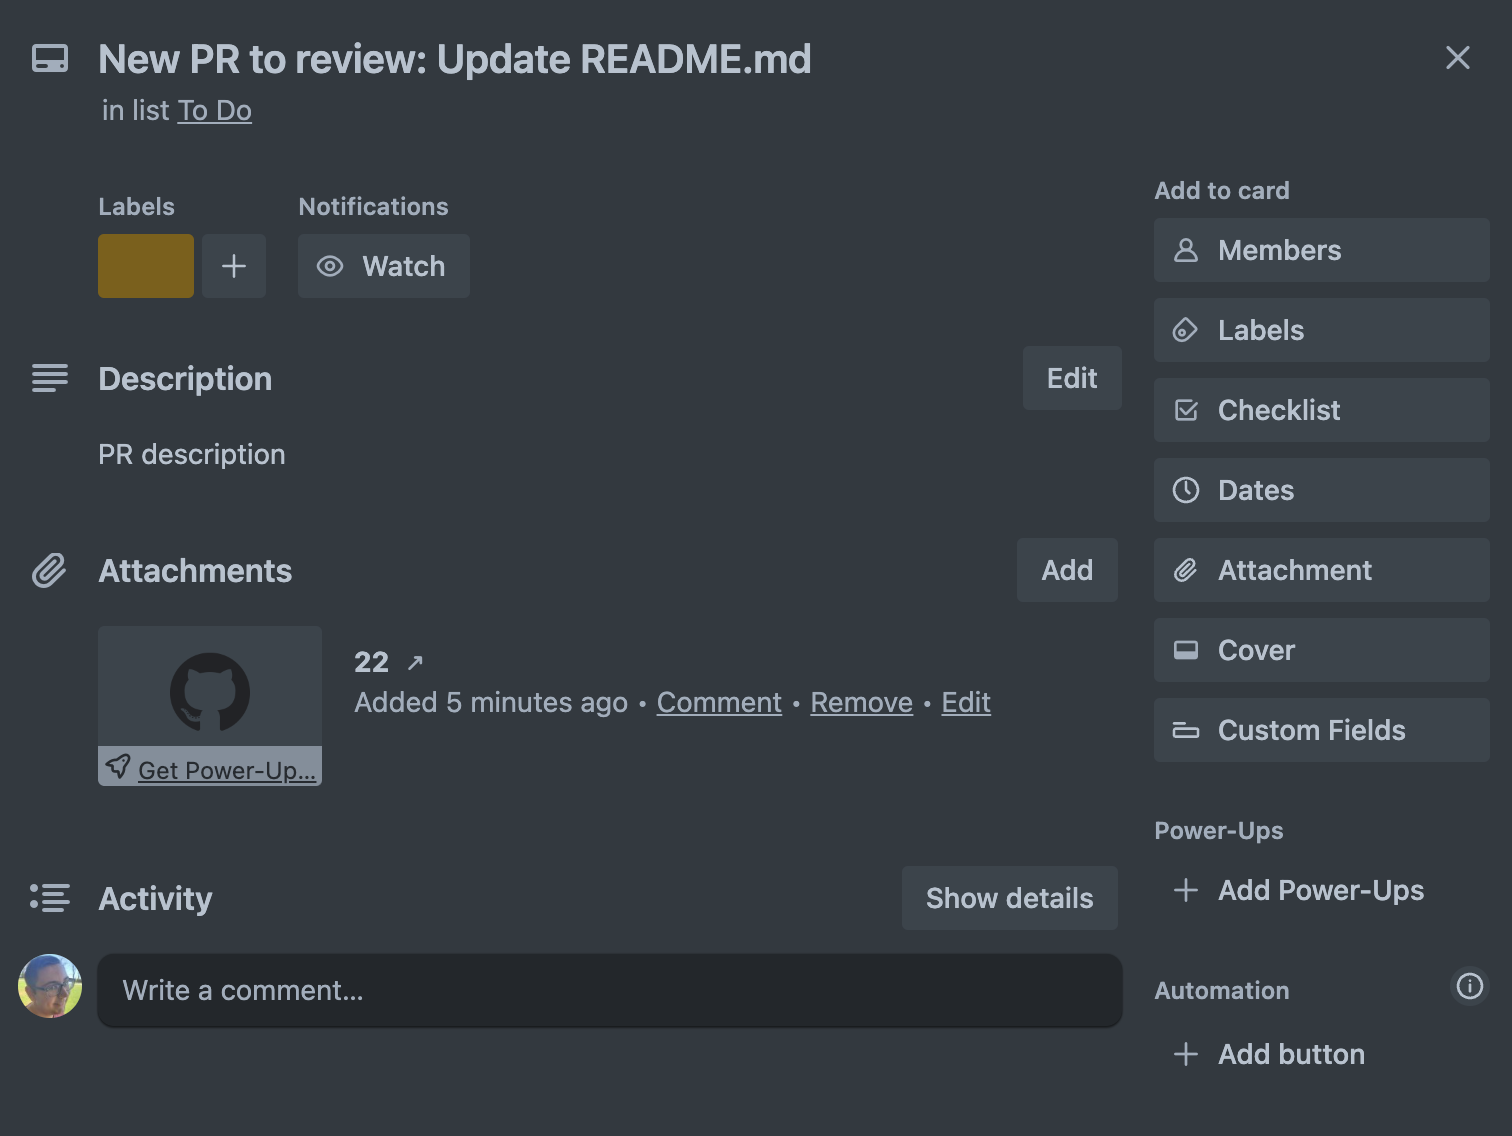
Now, in the Zap,you can pass this data to Trello to create a new task on the QA board. First, add the Trello app, select the Create Card event, and connect your Trello account. Then, you can build the card according to the information from gitStream:
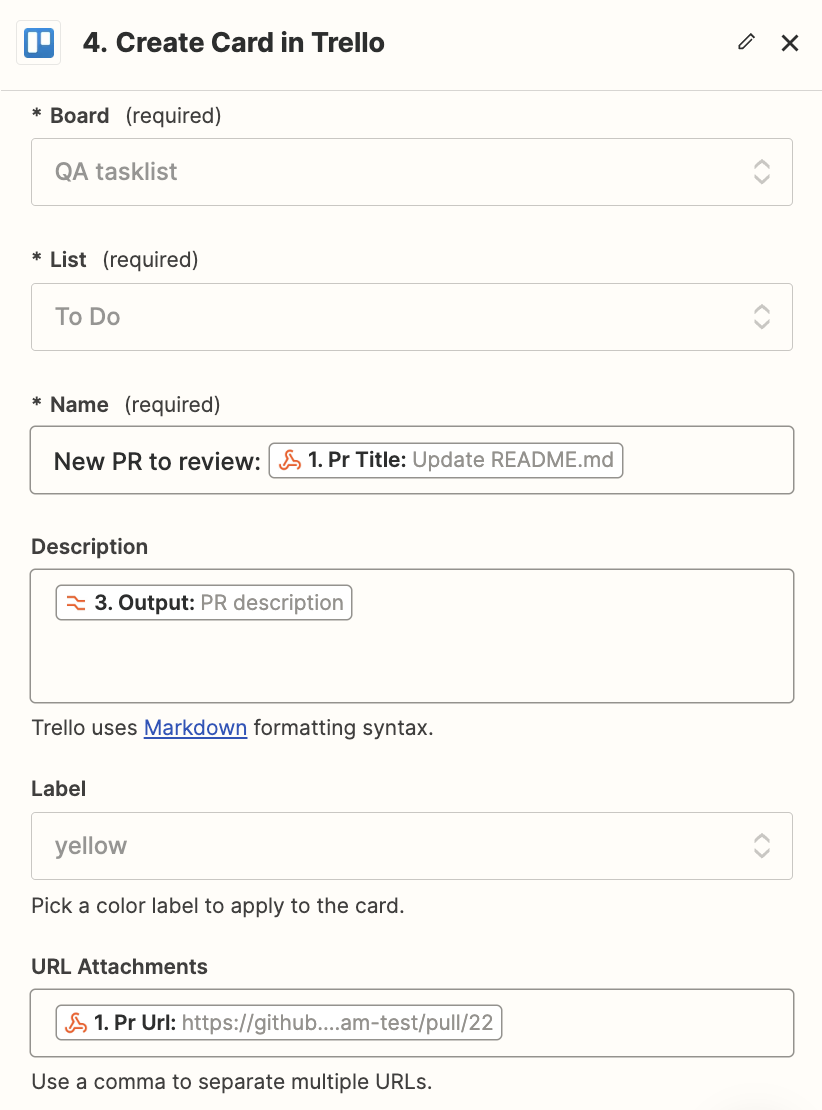
This example puts the task in a the 'To Do" column of the QA tasklist to make it easy for QA engineers to take it from there. The title, description and URL are all formatted to fit into Trello.
Automatically Schedule Sync Meetings
The next example can help if you're responsible for all the PR reviews that come in. You might want to schedule a synchronous group meeting for the last half hour of every day for all of that day’s PRs to be reviewed. Everyone assigned to review a PR that day is invited. gitStream and Zapier can help build those meetings, invite all the right people automatically, and skip the meeting altogether if it’s not necessary.
Start with this CM example:
Send PR Reviewer Info to Zapier
Automatically update Zapier with a list of PR reviewers.
Configuration Description
Conditions (all must be true):
- A PR is created or updated.
Automation Actions:
- gitStream sends the list of reviewers to Zapier via webooks.
Auto-Schedule Sync Meetings via Zapier
# -*- mode: yaml -*-

manifest:
  version: 1.0

pr_url: "https://github.com/{{ repo.owner }}/{{ repo.name }}/pull/{{ pr.number }}"

automations:
  zapier_export_pr_reviewers:
    if:
      - true
    run:
      - action: send-http-request@v1
        args:
          url: "{{ env.ZAPIER_WEBHOOK }}"
          method: "POST"
          headers: '{"Content-type": "application/json"}'
          body: '{ "reviewers": "{{ pr.reviewers }}" }'
Then in Zapier, set up a Zap like this:
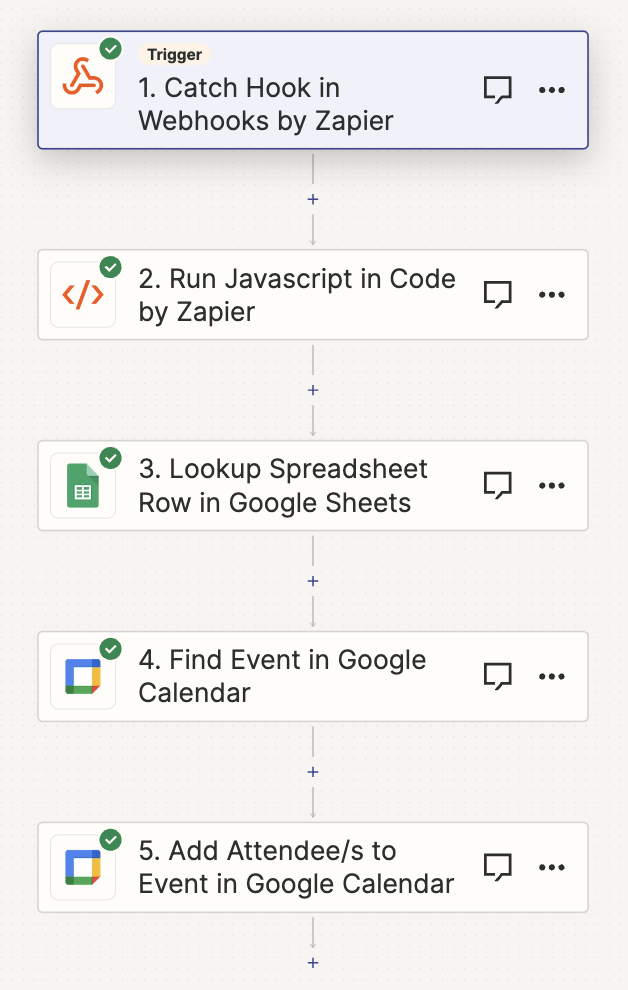
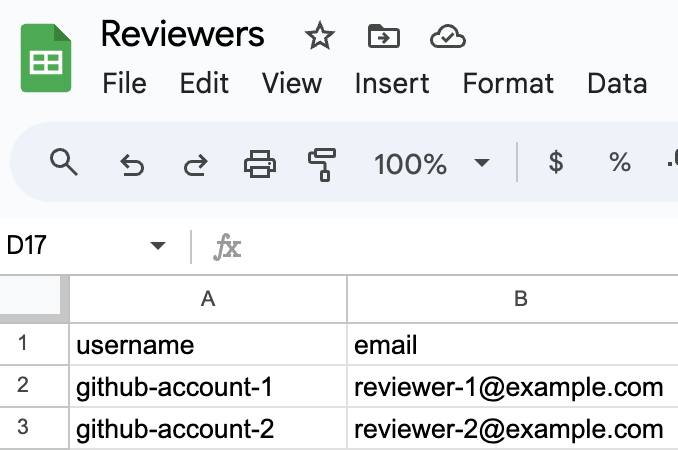
In the second piece of the Zap, you can write JavaScript (or Python) to format whatever you get from gitStream. If you return an array of the reviewer usernames, Zapier will run the rest of the steps of the Zap *once per reviewer*, which is what you want. Zapier also has a built-in lookup table you can use, but this example will use a Google Sheet for simplicity.
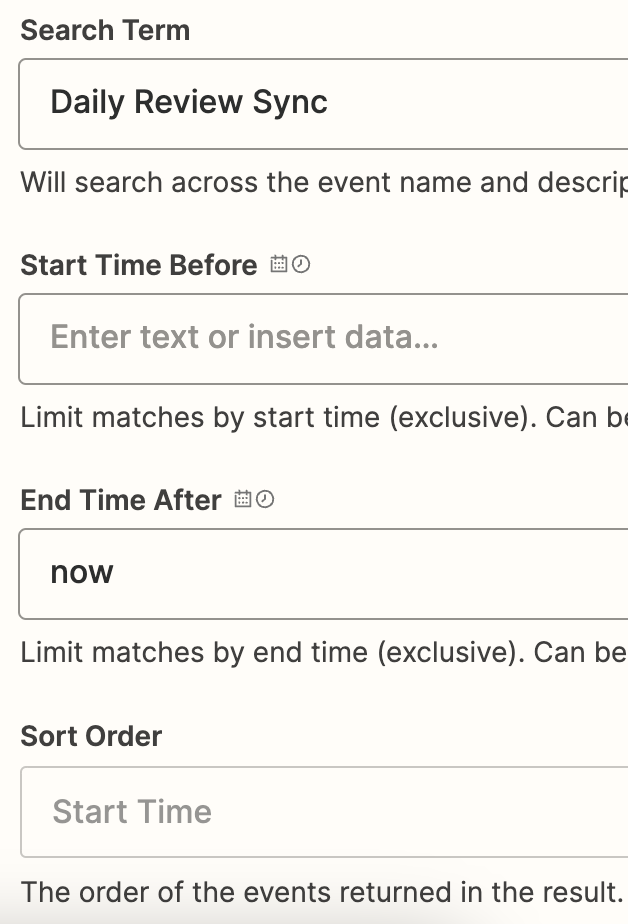
In the Find Event action of the Google Calendar app, search for the daily standup and create one if it doesn’t yet. If you set the new event not to repeat, then the standup will only be created when you have PRs to review. Just make sure the search term and the title of the new event match:

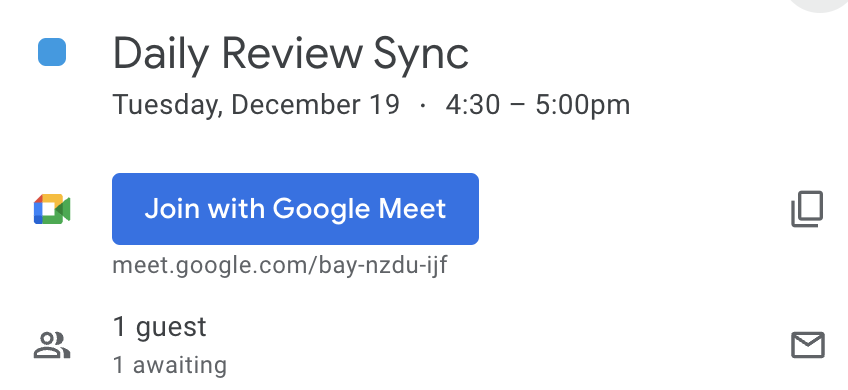
Lastly, search for the new calendar entry with the Add Attendee/s to Event action, and add the reviewer’s email as an attendee. Remember, this will run *for each reviewer* so you only need to build out this linear path.
Once you’re done, you’ll have your standup automatically added to the schedule whenever it’s needed:
Additional Resources
gitStream is a workflow automation tool that enables you to use YAML configuration files to optimize your code review process. Add context to PRs, find code experts for reviews, and automate the merge process to maximize developer productivity.
Learn More about how gitStream Works.
More Automations can be found on the Automation Library and Integrations pages.